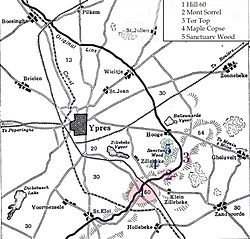
Hill 60 is a World War I battlefield memorial site and park in the Zwarteleen area of Zillebeke south of Ypres, Belgium. It is located about 4.6 kilometres (2.9mi) from the centre of Ypres and is directly on the railway line to Comines. Before the First World War the hill was known locally as Côte des Amants (Lover's Knoll). The site comprises two areas of raised land separated by the railway line; the northern area was known by soldiers as Hill 60 while the southern part was known as The Caterpillar.
Zillebeke, Belgium: tracks of Ypres-Comines railway, with Hill 60 on the left
The high ground of Hill 60, south of Zillebeke, was created in the 1850s by spoil dumped from the cutting of the railway line between Ypres and Comines. The line opened in March 1854 and formed part of the La Madeleine–Comines railway from the French Nord-Pas-de-Calaisregion into Belgian Flanders.[1]
The earth excavated during the building of the railway was dumped on either side of the embankment and formed hillocks. On the west side, a long irregular mound atop the ridge was called The Caterpillar and a smaller mound 300yd (270m) down the slope towards Zillebeke, was known as The Dump. On the east side of the cutting, at the highest point of the ridge, was a third mound known as Hill 60, about 60ft (18m) above sea level, from which First World War artillery observers had an excellent view of the ground around Zillebeke and Ypres. Artillery-fire and mine explosions during the war changed the shape of the hill and flattened it considerably. Today the peak of Hill 60 is only about 13ft (4m) higher than the land in the vicinity.[citation needed]
Entrance to the memorial site and park
The ground south of Zillebeke rises for about 2,000yd (1,800m) to a ridge between Zwarteleen and Zandvoorde. Roads run north-west to south-east through the area, from Ypres to Verbrandenmolen and Hollebeke as well as from Zillebeke to Zwarteleen and Zandvoorde. The Ypres–Comines railway ran roughly parallel to the roads from Ypres and 600yd (550m) outside Zillebeke, was a cutting 15–20ft (4.6–6.1m) deep, which extended beyond the crest of the ridge, the earth from which had formed Hill 60. About 0.75mi (1.2km) further south is The Bluff and some 1.5mi (2.4km) south-west is St. Eloi.[citation needed]
First World War
1914
November
Location of Hill 60 and The Caterpillar in the Ypres SalientFortifications on the railway embankment at Hill 60
During the First World War, Hill 60 was a small promontory on the edge of the Ypres Salient, with good views for the Germans across the British lines into Ypres, which gave it great tactical significance. During the First Battle of Ypres in late 1914, Hill 60 was held by the Moussy Detachment (General Vidal), which had been depleted by the transfer of three battalions to Langemarck. On 11 November, during the Battle of Nonne Bosschen, the detachment repulsed German attacks until noon, when the left flank units of the German 30th Division forced the French back to Hill 60 and Verbrandenmolen. No French or British reserves or reinforcements were available until the French 7th Hussars dismounted at Zillebeke and counter-attacked, carrying the remaining infantry of the detachment along in the rush. The French line was re-established from a bridge near Voormezeele to Verbrandenmolen and Zwarteleen, which was still only 3,000yd (1.7mi; 2.7km) from Ypres. The German account recorded that Hill 60 had been captured but Lieutenant-General Dubois (the 9ème Corps d'Armée commander) and other witnesses denied this. When British troops relieved the French in the area on the night of 1/2 February 1915, the hill was certainly held by the Germans.[2][3]
Ypernbogen, diagram showing the German advance during the Second Battle of Ypres
On 17 February 1915, British sappers blew a small mine at Hill 60 which they had taken over from the French, but without great effect. The Germans retaliated with a small mine at Zwarteleen but were driven out of the British positions. On 21 February, they blew a large mine nearby, killing forty-seven men and ten officers of the 16th Lancers. In mid-March the Germans sprung another large mine at Zwarteleen, creating a 9.1m (30ft) deep crater and damaging their own lines in the process.[4] In the spring of 1915, there was constant underground fighting in the Ypres Salient at Hooge, Hill 60, Railway Wood, Sanctuary Wood, St Eloi and The Bluff which required the deployment of new drafts of tunnellers for several months after the formation of the first eight tunnelling companies of the Royal Engineers.[5]
After the Battle of Gravenstafel Ridge (22–23 April 1915) the British planned a local withdrawal to less exposed positions, roughly 3mi (4.8km) distant from Ypres. The new line was to run from Hill 60 northwards to Hooge on the Ypres–Menin road, thence to Frezenberg Ridge, Mouse Trap Farm and then back to the Ypres–Yser canal. Large working parties from the 28th Division and the 50th (Northumbrian) Division began to dig the new line under cover of darkness and the retirement from the eastern side of the salient took place on the night of 1/2 May, during the Battle of St. Julien (24 April – 5 May). The 27th Division took over the area from just west of Hill 60, to about 0.5mi (0.80km) short of the Ypres–Roulers railway. The Germans followed up their success by attacking again at the Battle of Frezenberg Ridge (8–13 May), which gained Frezenberg, Verlorenhoek and the vicinity but attacks south of the Menin road gained very little ground.[6]
In spring 1915, earlier French preparations to raid the hill were continued by the British 28th Division, which took over the line in February 1915 and then by the 5th Division (Major-General Thomas Morland). The Allied plan to attack Hill 60 was expanded into an ambitious attempt to capture the hill, despite advice that Hill 60 could not be held unless The Caterpillar nearby was also occupied. A French 3 by 2 feet (0.91m ×0.61m) mine gallery under the hill was extended by experienced miners from Northumberland and Wales, after it was found that Hill 60 was the only place in the area not waterlogged.[7]
In the first attack of the newly formed Royal Engineer tunnelling companies in the Ypres Salient, the 173rd Tunnelling Company laid six mines by 10 April 1915, an operation planned by Major-General Edward Bulfin, commander of the 28th Division and continued by the 5th Division after the 28th Division was relieved.[8] The 173rd Tunnelling Company began work early in March and three tunnels were begun towards the German line about 50yd (46m) away, a pit first having been dug some 16ft (4.9m) deep; the tunnels were more than 100yd (91m) long.[9][10] Two more mines in the north were charged with 2,000lb (910kg) of explosives each, two mines in the centre had 2,700lb (1,200kg) charges and in the south, one mine was packed with 500lb (230kg) of guncotton, although work on it had been stopped when it ran close to a German tunnel.[11] The attack began on 17 April and the 5th Division captured the area quickly with only seven casualties but found that the new salient made permanent occupation of the hill costly.[7][a]
Loss of Hill 60
A Mine Crater, Hill 60 Art.IWMART1601
On 1 May, after a bombardment by heavy artillery, the Germans released chlorine gas at 7:00 p.m., from positions less than 100yd (91m) away from Hill 60, on a front of 0.25mi (0.40km). The gas arrived so quickly that most of the British were unable to put on their improvised respirators. As soon the gas arrived, the Germans attacked from the flanks with bombing parties and artillery laid a barrage on the British approaches to the hill. Some of the British returned fire and reinforcements arrived by rushing through the gas cloud and bombing parties forced the Germans back. The original garrison lost many casualties in standing their ground, including many gas casualties.[13]
The 5th Division held the hill on a 1.25mi (2.01km) front with the 15th Brigade on 5 May, when the Germans discharged gas from two places opposite the hill at 8:45 a.m.[14] The wind blew the gas along, rather than across, the British defences and only one sentry was able to sound the gas alarm. The British defence plan required troops under gas attack to move to the flanks but the course of the gas cloud made this impossible. The gas hung so thick that it was impossible to remain in the trenches and troops who stood their ground were overcome. The German 30th Division advanced fifteen minutes after the gas cloud and occupied nearly all of the front line on the lower slope of the hill. British reinforcements bombed up a communication trench and two more battalions were sent forward but before they arrived, the Germans released another gas cloud at 11:00 a.m. to the north-east of the hill.[15]
A bunker on Hill 60
The right flank of the Zwarteleen Salient was overrun, which increased the gap left by the first discharge; a few men on the left delayed the German infantry until 12:30 p.m., when a battalion advanced through the gas cloud and an artillery barrage. Constant counter-attacks forced some of the Germans back and regained several lost trenches. The Germans held on to the crest and released more gas at 7:00 p.m., which had little effect and an infantry attack which followed was repulsed by rifle-fire. At 9:00 p.m., the 13th Brigade arrived and attacked at 10:00 p.m. after a short bombardment the darkness, state of the ground and alert German infantry repulsed the attack, except for a party which reached the top of the hill, then withdrew at 1:00 a.m. under enfilade-fire from the Caterpillar and Zwarteleen, which made the hill untenable. Both sides were exhausted and spent the next day digging-in. At dawn on 7 May, the British attacked with two companies of infantry and attached "bombers" using hand grenades, all of whom were killed or captured.[16][b] From 22 April to 31 May 1915, the British had 59,275 casualties in the Second Battle of Ypres and the fighting for Hill 60.[18]
On 19 December 1915, the 50th Division was due to relieve the 9th (Scottish) Division from Hill 60 to near the Menin Road, an area where skirmishing, raiding and mining by both sides never stopped. At 5:00 a.m., a German artillery and gas bombardment began on the north side of the Ypres salient and the gas reached the 50th Division positions behind the 9th Division, which forced the men to don their eye protectors but not gas helmets. German artillery-fire fell all round the salient and at noon the 50th Division received an order to stand down, as the attack had been limited to the areas of the 6th Division and 49th Division further north. The German bombardment continued all day but the relief took place in the evening, with the 149th Brigade taking over on the right, just west of Hill 60 with the 5th and 6th battalions, Northumberland Fusiliers, in positions only a few feet from German advanced posts; Christmas Day was spent in cold, mud and under showers of rain.[19]
Maintaining field fortifications in the Ypres Salient over the winter of 1915–1916 was an endless task, as trenches flooded and collapsed, dugouts were swamped and communications were cut. Immediate repairs were necessary but had to be done at night, under constant harassing fire. Artillery and snipers from both sides were always active and patrols went out each night. Mining and counter-mining was constant, which kept trench garrisons under permanent strain, in fear of explosions which could occur anywhere without warning. Aircraft of both sides were overhead, except in the foulest weather, flying contact-patrol, photographic reconnaissance and artillery-observation sorties. On 12 February, two German raids were made on the 50th Division north of Hill 60 and on 14 February, the Germans attacked at Hooge against the 24th Division, on the left flank, which included a bombardment of trenches 37, 38 and 39 opposite Hill 60.[20]
Late in the afternoon the Germans sprung two mines near Trench 49 and Trench A1 which left two craters, one 15ft (4.6m) deep and 60ft (18m) wide but with no effect.[20] An explosion at 6:00 p.m., near the end of Trench 41, blew up a bombing sap, killed 13 Green Howards and wounded another four; small raiding parties appeared but were shot down in no man's land.[20] In the area of the 17th (Northern) Division on the right flank at The Bluff, the Germans took the front line held by the 51st Brigade, which fell back to the support line and made a counter-attack 15 February, which failed. For the rest of February the area around Hill 60 returned to "normal" siege warfare but preparations were made secretly to recapture The Bluff. The 50th Division participated in artillery-bombardments, grenade attacks and trench mortaring to convince the Germans that an attack was being prepared against Hill 60, demonstrations which continued into March.[21]
April
After a month in reserve, the 23rd Division returned to the front line at Hill 60 to relieve the 47th (1/2nd London) Division and part of the 39th Division between 1 and 9 April, from Henry Street to the railway cutting south-east of Verbrandenmolen, along the west slope of Hill 60 just below the crest, for 500yd (460m) to the north before turning east to Mount Sorrel and then north-east to St. Peter's Street on Observatory Ridge, a frontage of about 2,500yd (2,300m). At 9:00 a.m. on 9 April, German artillery began a bombardment until 5:45 p.m., obliterated most of the front line, isolated the right flank battalions and blew in the entrances to the tunnel leading to the British mining system.[22][c]
At 6:43 p.m. the German artillery opened fire again and the British infantry sent up SOS flares for artillery support, which began immediately but not swiftly enough to prevent German troops dashing forward and getting into the trenches of the left-hand company of the 8th Battalion York and Lancaster Regiment (8th York and Lancs), which had been reduced from 152 to 47 men by the bombardment. The survivors counter-attacked and then chased the raiding party into no man's land assisted by the right-hand company. Other German troops broke into the positions of the 11th Battalion Sherwood Foresters and reached the Deep Support Line 100 yards (91m) further back. In the mêlée one of the tunnel entrances was cleared but troops posted to guard it were killed by a shell and German troops threw gas bombs into the gallery until some of the troops inside burst out and drove the Germans back with hand grenades. On the right flank raiders ran up Marshall Lane, parallel to the railway, bombed the entrances to subways and got close to the main mine shafts, just as reinforcements arrived from Battersea Farm and recaptured the lane.[24]
May
From 24 to 28 May, the 50th Division returned to the front line from reserve and resumed the struggle for fire supremacy. The British gradually suppressed the German artillery but found that German trench mortar crews were much harder to defeat, particularly those manning a trench howitzer who fired 3 to 4 round bursts, which were unusually destructive and then took cover. The divisional artillery retaliated immediately but never managed to destroy the gun. By frequent night patrols and raids the division gained control of no man's land but German mining continued with intermittent success and a gas attack was carried out by the Germans on the night of 16/17 June.[25]
1917
April–May
At the end of April the 19th (Western) Division received orders for the 57th Brigade to relieve the 70th Brigade of the 23rd Division at Hill 60 and for the 58th Brigade to take over at Hooge. On the night of 2/3 May, the 57th Brigade took over with the 10th Royal Warwicks (10th Warwicks) on the right, 10th Worcesters in the centre, 8th North Staffs on the left and the 8th Gloucesters in reserve at the Railway Dugouts. The night of 8/9 May was quiet but in the morning a German trench mortar bombardment fell on the 10th Warwicks and in the afternoon observers reported that preparations for a raid could be seen.[26] The Warwicks reported that much movement was seen in the German lines and that two officers on the Caterpillar with maps and sheets of paper, were thought to be sketching the British lines at 1:50 p.m., 2:55 p.m. and 5:10 p.m. In front of the Caterpillar, sandbags and two trees with white painted blobs could be seen facing the British lines. British units on the flanks were alerted and at 9:30 p.m. a German artillery and machine-gun bombardment began.[27]
No raiders appeared and at 11:10 p.m. the British stood down. At 3:30 p.m. on 10 May another bombardment fell on the 10th Warwicks and telephone communication with the battalion was lost. Scouts went forward and saw that the supporting positions were secure and the divisional artillery responded promptly to an SOS flare as rifle and machine-gun fire was opened by the British infantry. After the end of the German bombardment, the six man Lewis-gun squad in number 2 post of D Company, were found to be missing. The rest of the D Company posts were badly damaged and those of C Company were found undamaged. The C Company support line had been blown in, with several casualties. The British concluded that the vigilance of the 57th Brigade had prevented a big raid on the 8th Gloucesters who had taken over from the 10th Worcesters in the centre on the night of 6/7 May.[28]
Plan of the two deep mines placed at Hill 60 before the Battle of MessinesThe access to the Berlin Tunnel mine gallery was located left of the tree in the centre.Crater of the Hill 60 mine detonated as part of the Mines in the 1917 Battle of Messines
After the Battle of Hill 60 (April–May 1915), Tunnelling companies of the Royal Engineers (RE) took up mining operations under the hill and the neighbouring ground on a much more ambitious scale. Deep mining under the German galleries beneath Hill 60 began in late August 1915, with the 175th Tunnelling Company, which began a gallery 220yd (200m) behind the British front line and passed 90ft (27m) beneath the German positions. The British underground works consisted of an access gallery (Berlin Tunnel) leading to two mine chambers, Hill 60 A (beneath Hill 60) and Hill 60 B (beneath The Caterpillar), to be loaded with explosives and detonated at the appointed time. The 3rd Canadian Tunnelling Company took over in April 1916 and completed the galleries, the Hill 60 mine being charged with explosives in July 1916 and the branch gallery under The Caterpillar in October.[29]
By October 1916, the mine under Hill 60 held 53,300 pounds (24,200kg) of explosives and that under The Caterpillar 70,000lb (32,000kg), despite water-logging and the demolition by a camouflet of 200ft (61m) of a German gallery above the British diggings, which endangered the British deep galleries.[29][30] The 1st Australian Tunnelling Company took over in November 1916 and maintained the mines beneath Hill 60 and The Caterpillar over the winter and months of underground fighting until June 1917, when they were fired along with the rest of the mines under Messines Ridge at the beginning of the Battle of Messines (7–14 June 1917).[29][30] When the mines were detonated at 3:10 a.m. on 7 June 1917, 990,000lb (450,000kg) of explosives went off under the German positions, demolishing a large part of Hill 60 leading to c.10,000 German casualties between Ypres and Ploegsteert that day.[31][d]
Suddenly at dawn, as a signal for all of our guns to open fire, there rose out of the dark ridge of Messines and 'Whitesheet' and that ill-famed Hill 60, enormous volumes of scarlet flame [...] throwing up high towers of earth and smoke all lighted by the flame, spilling over into fountains of fierce colour, so that many of our soldiers waiting for the assault were thrown to the ground. The German troops were stunned, dazed and horror-stricken if there [sic] were not killed outright. Many of them lay dead in the great craters opened by the mines.
The Battle of Messines was conducted by the British Second Army (General Herbert Plumer) and forced the German army to move reserves to Flanders from the Arras and Aisne fronts, which relieved pressure on the French. The objective of the attack was to capture the German defences on the ridge, which ran from Ploegsteert Wood in the south through Messines and Wytschaete to Mount Sorrel and deprive the 4th Army of the high ground south of Ypres. The ridge commanded the British defences and back areas further north, from which the British intended to conduct the "Northern Operation", an advance to Passchendaele Ridge, then capture the Belgian coast up to the Dutch frontier.[34]
During the German Spring Offensive, the 9th (Scottish) Division lost 50 per cent of its infantry and was transferred to Flanders, to hold a quiet front while recovering from its losses and incorporating fresh drafts from Britain.[e] The South African Brigade was down to about 1,300 men with few replacements and went into reserve around Ridge Wood. The division came under the command of IX Corps (Lieutenant-General Alexander Hamilton-Gordon) of the Second Army and began to relieve part of the 1st Australian Division on the night of 3/4 April, on a 3,000yd (1.7mi; 2.7km) front, from Hollebeke, over the Ypres–Comines Canal, to Bulgar Wood. (Hill 60 was well behind the front line, having been captured during the Battle of Messines in June 1917.)[36]
The ground north of the canal was considered the most vulnerable to attack, since it was the southern flank of the Passchendaele Salient and Zandvoorde Ridge provided cover for troops concentrating to attack Klein Zillibeke Spur and Hill 60. South of the canal was a reserve line of well-wired posts towards The Stables to the south-west, backed by the White Château on a commanding rise, which had been fortified. From The Stables, two thick belts of barbed wire ran south-east and south-west, behind which were some posts with scratch garrisons, due to the need adequately to garrison Hill 60, The Bluff and White Château.[37]
On 15 April 1918 Hill 60 was abandoned by the 21st Division as part of its planned withdrawal to a line west of Zillebeke Lake.
The 35th Division came into line opposite the hill in early September and commenced patrols and raids into the German lines opposite on 4 September. On 13 September, there was an increase in German artillery-fire and on 15 September, the division advanced 600–1,000yd (550–910m) closer to the hill in a night attack, against variable opposition from the 40th Saxon Division[38] On 28 September, the Second Army attacked with the Belgian Army to the north and the 35th Division met little opposition from the Germans opposite, 650 of whom surrendered. The 104th Brigade advanced in the centre of the division and met only slight opposition in its advance east of Hill 60 and The Caterpillar. By 8:30 a.m. the Brigade had reached a line from Klein Zillebeke to Canada Tunnels. Patrols pushed on and captured Jehovah Trench, then three field guns about 1,000yd (910m) east of Klein Zillebeke.[39]
Post-war
In 1920, Hill 60 was bought by Lieutenant-Colonel Cawston who later sold a half share in it to John J Calder a prominent Scottish brewer whose son Capt. James Calder (Lovat Scouts) was awarded the Military Cross for action there. In 1930, Calder donated his share of Hill 60 to the Imperial War Graves Commission (now Commonwealth War Graves Commission), which maintains it as a battlefield memorial park.[citation needed]
World War II
1940
Twenty-two years after the end of World War I, the area at Hill 60 was fought over again when the 17th Brigade of the British 5th Infantry Division stopped the advance of three German divisions from 27 to 28 May 1940, which saved the British Expeditionary Force (BEF) during the Second World War. On 27 May 1940, part of A Company of the 2nd Battalion Royal Scots Fusiliers (2nd RSF) were dug in on the hill.[40] The hill was subjected to a tremendous mortar and artillery barrage (Coy HQ in and around the concrete bunker near the top of the hill) and there was hand-to-hand fighting on the nearby Zwarteleen crossroads, when a fighting patrol from 2nd RSF set off to destroy German machine gun and mortar positions there. The patrol enabled the evacuation of the defences on the railway, a withdrawal to the canal line and a general withdrawal towards St Eloi, Kemmel and Dikkebus. Other companies of the 2nd RSF held the railway line between Hill 60 and the canal bridge. The 2nd Inniskillings were to their right and rear, on the main road, D Company of the 2nd RSF was in reserve and the 6th Seaforths held "the Dump". Constant attacks by three German divisions were repulsed during 28 May, which reduced the two 5th Division brigades to c.600 men each and exhausted the artillery ammunition of I Corps.[41] The division held the "Dunkirk corridor" open for another day, which saved II Corps and the rest of the BEF. Thousands more troops were able to withdraw into the Dunkirk perimeter and the 5th Division then moved to the Yser with the 42nd Division, to fill the gap left when the Belgian army capitulated.[42][f] During this action the large observation bunker from the First World War was also badly damaged by German PAK anti tank gun munitions and the Queen Victoria's Rifles Memorial was so badly damaged it later required reconstruction.[44]
1944
French Resistance Memorial to Marchant and Olivier 1944
Pierre Marchant and Lucien Olivier, members of the French resistance from La Madeleine (now a suburb of Lille), were shot by German soldiers near Hill 60 on 2 September 1944, after trying to escape from a prisoner transport train. Marchant and Olivier had been driving a lorry loaded with munitions for the Resistance in their home town when they were arrested by the SS and put on a train to Belgium. When their train stopped between Zillebeke and Hollebeke to await the arrival of an extra engine from Ypres, to haul the train over the incline, Marchant and Olivier were killed by the Germans and their bodies thrown off the train. Their mortal remains were found by locals about 660ft (200m) from Hill 60. Marchant and Olivier were buried temporarily at Zillebeke and repatriated to France after the war. A memorial was erected near the railway line at Hill 60 in 1969, which was refurbished and rededicated in the presence of their family members in 2004.[citation needed]
Later history
Hill 60 and The Caterpillar are designated a battlefield memorial site and open to the public. The area was merged into the municipality of Zillebeke in 1970 and into the city of Ypres in 1976. In spring 2015, extensive repairs were carried out at the memorial park.[citation needed]
Memorials
Hill 60 memorial site dedicationSmall private memorialsQueen Victoria's Rifles Memorial1st Australian Tunnelling Company Memorial14th (Light) Division Memorial
There are several memorials on Hill 60, that to the Australian Tunnelling Companies, that to Queen Victoria's Rifles, that to the 14th (Light) Division, and to French resistance fighters killed here during the Second World War. It is also known that at least one veteran of World War I, Mr P. G. Arnold from Birmingham, had asked his widow to scatter his ashes here after his death in 1931.[citation needed]
Hill 60 Battlefield Memorial Park
In the collapsed tunnels beneath Hill 60, many British and German dead are buried. The Belgian government made the hill and the surrounding enclosure a battlefield memorial site and to preserve it, far as nature permits, in the state in which it was left after World War I. The park at the memorial site is maintained by the Commonwealth War Graves Commission (CWGC). The memorial park also has the remains of several bunkers and craters from the fighting from 1915–1917. A large concrete bunker in the centre of the site is preserved almost as it was found at the end of the war. This bunker was originally German, but modified by the Australians in 1918.[citation needed]
Also on Hill 60 is a stone plaque which gives the following summary,
Hill 60, the scene of bitter fighting, was held by German troops from the 16th December 1914 to the 17th April 1915, when it was captured (after the explosion of five mines) by the British 5th Division. on the following 5th May it was recaptured by the German XV Corps. it remained in German hands until the battle of Messines (7th June 1917) when, after many months of underground fighting, two mines were exploded here; and at the end of April 1918, after the battles of the Lys, it passed into German hands again. it was finally retaken by British troops under the command of H. M. King of the Belgians on the 28th September 1918. In the broken tunnels beneath this enclosure many British and German dead were buried, and the hill is therefore preserved, so far as nature will permit, in the state in which it was left after the great war.
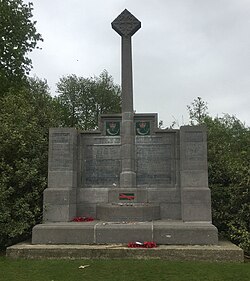
Queen Victoria's Rifles Memorial
The memorial to the Queen Victoria's Rifles (9th Battalion The London Regiment) is located within the Hill 60 Battlefield Memorial Park. It was replaced after the original was damaged during the Second World War. On the night of 20–21 April 1915, Second Lieutenant Geoffrey Harold Woolley and a handful of men were the only defenders on the hill and continually repelled attacks on their position. He encouraged the men to hold the line against heavy enemy machine gun fire and shellfire. For a time he was the only officer on the hill. When he and his men were relieved on the morning of 21 April only 14 out of a company of 150 had survived. For his gallantry he was awarded the Victoria Cross, the first to be awarded to a Territorial Force officer.[45]
The Queen Victoria's Rifles (QVR) had arrived in Le Havre on 5 November 1914 and were one of the first Territorial battalions to serve in France; they were attached to the 5th Division. On 17 April 1915, an attack was mounted on Hill 60 by the 13th Infantry Brigade which included the 2nd King's Own Scottish Borderers, the 2nd Duke of Wellington's West Riding Regiment, the 1st Queen's Own Royal West Kent Regiment, the 2nd King's Own Yorkshire Light Infantry and the Queen Victoria's Rifles (9th London Regiment). Prior to the attack, the hill had been undermined with five galleries being driven under the German positions.[46] The plan was to detonate the mines under the hill to destroy the enemy and their positions, after which the 13th Infantry Brigade would occupy the area. Hill 60 was captured on 17 April 1915 and on 20 April, two and a half companies of the QVRs were ordered up to the front line as the enemy made a counter-attack. At dawn on 21 April 1915, the Germans began bombarding the QVRs with hand grenades. Casualties were heavy, including two officers, Major Lees and Lieutenant Summerhays, who were killed. It was then that Woolley left a position of safety to take command of the soldiers on Hill 60. The QVRs remained in France for the rest of the war and their losses are remembered at Hill 60 by the QVR memorial and at the nearby QVR café and museum.[47]
1st Australian Tunnelling Company Memorial
This memorial commemorates the men of the 1st Australian Tunnelling Company who gave their lives in the tunnelling and defensive operations in this area from 1915–1918. The memorial is located next to the entrance gate of the Hill 60 Battlefield Memorial Park. The inscription reads
In memoriam of officers and men of the 1st Australian Tunnelling Coy who gave their lives in the mining and defensive operations of Hill 60 1915–1918 / this monument replaces that originally erected in April 1919 by their comrades in arms / 1923
14th (Light) Division Memorial
This memorial commemorates the men of the 14th (Light) Division who gave their lives in fighting in this area from 1915–1918. The memorial is located outside the Hill 60 Battlefield Memorial Park, between the 1st Australian Tunnelling Company Memorial and the French Resistance Memorial.[citation needed]
French Resistance Memorial
This memorial commemorates Pierre Marchant and Lucien Olivier, two members of the French resistance from La Madeleine (now a suburb of Lille) who were killed here by Germans on 2 September 1944. A memorial to Marchant and Olivier was erected in 1969. It was refurbished and rededicated in the presence of their family members in 2004. The memorial is located outside the Hill 60 Battlefield Memorial Park, in between the 14th (Light) Division Memorial and the bridge over the railway tracks between Hill 60 and The Caterpillar.[citation needed]
Landscape
Map of Hill 60 as part of the Flanders front in 1915
Paul Nash, The Landscape, Hill 60 painted in 1918
Within Hill 60 battlefield park
Within Hill 60 battlefield park
Deep mine crater from 1917
Area near top of Hill 60
View from Hill 60 towards the Zwarteleen area of Zillebeke
View from Hill 60 towards the Zwarteleen area of Zillebeke
View from Hill 60 towards the railway
Fortifications
German soldiers outside a shelter on Hill 60 in June 1916
Australian soldiers in a dugout on Hill 60
Entrance to a dugout
Remains of pillbox
Destroyed shelter
German concrete bunker modified by the Australians in 1918
German concrete bunker modified by the Australians in 1918
Roof of the German bunker modified by the Australians in 1918
↑ In February 1915, "grenadier" companies of thirty men had been formed in each brigade; twenty of whom would be attached to an infantry battalion involved in an attack, the remaining ten being kept as a reserve. Bombers were integrated into battalions in the spring of 1915, with eight bombers and an NCO per bombing platoon. Specialist platoons were disbanded later in 1915 and all infantry trained in bombing. The term "bomber" was used to replace "grenadier" in March 1916, after complaints from the Grenadier Guards that the term could cause confusion.[17]
↑ German aircraft gained air superiority over the salient in the autumn of 1915 but from May–July 1916 the Royal Flying Corps recovered control, with new aircraft designs and new tactics.[23]
↑ The mines exploded over a period of 19 seconds, mimicking the effect of an earthquake and 15mi (24km) away in Lille, German troops ran around "panic-stricken".[32] That the detonations were not simultaneous added to the effect on German troops, as the explosions moved along the front. Odd acoustic effects also increased the shock and Germans on Hill 60 thought that the Kruisstraat and Spanbroekmolen mines were under Messines village, well behind their front line; some British troops thought that they were German counter-mines, going off under British support trenches.[32]
↑ Most of the replacements were youths of 18 and 19, having been conscripted at 17 and given a year's decent food and exercise.[35]
↑ The 1st Australian Tunnelers Memorial still bears the scars of this battle.[43]
Davson, H. M. (2003) [1926]. The History of the 35th Division in the Great War (facs. repr. Naval & Military Press, Uckfielded.). London: Sifton Praed. ISBN1-84342-643-9.
Edmonds, J. E. (1925). Military Operations France and Belgium, 1914: Antwerp, La Bassée, Armentières, Messines and Ypres October–November 1914. History of the Great War Based on Official Documents by Direction of the Historical Section of the Committee of Imperial Defence. Vol.II. London: Macmillan. OCLC220044986.
Edmonds, J. E.; Wynne, G. C. (1995) [1927]. Military Operations France and Belgium, 1915: Winter 1914–1915: Battle of Neuve Chapelle: Battles of Ypres. History of the Great War Based on Official Documents by Direction of the Historical Section of the Committee of Imperial Defence. Vol.I (facs. repr. Imperial War Museum Department of Printed Books and Battery Pressed.). London: Macmillan. ISBN0-89839-218-7.
Edmonds, J. E. (1991) [1948]. Military Operations France and Belgium 1917: 7 June – 10 November. Messines and Third Ypres (Passchendaele). History of the Great War Based on Official Documents by Direction of the Historical Section of the Committee of Imperial Defence. Vol.II (facs. repr. Imperial War Museum Department of Printed Books and Battery Pressed.). London: HMSO. ISBN0-89839-166-0.
Ellis, L. F.; Allen, G. R. G.; Warhurst, A. E. & Robb, J. (2004) [1962]. Butler, J. R. M. (ed.). Victory in the West: The Battle of Normandy. History of the Second World War United Kingdom. Vol.I (facs. repr. Naval & Military Press, Uckfielded.). London: HMSO. ISBN1-84574-058-0.
Jones, H. A. (2002) [1928]. The War in the Air, Being the Story of the Part Played in the Great War by the Royal Air Force. Vol.II (facs. repr. Imperial War Museum Department of Printed Books and N & M Pressed.). London: Clarendon Press. ISBN1-84342-413-4.
Sandilands, H. R. (2003) [1925]. The 23rd Division 1914–1919 (facs. repr. Naval & Military Press, Uckfielded.). Edinburgh: Wm. Blackwood. ISBN1-84342-641-2.
Schwink, O. (1919) [1918]. Die Schlacht an der Yser und bei Ypern im Herbst 1914[Ypres, 1914, an Official Account Published by Order of the German General Staff]. Translated by Wynne, Graeme Chamley (Constableed.). Oldenburg: Gerhard Stalling. OCLC3288637. Retrieved 29 June 2015– via Archive Foundation.
Sheffield, G.; Todman, D. (2004). Command and Control on the Western Front: The British Army's Experience 1914–18. Staplehurst: Spellmount. ISBN1-86227-083-X.
Wyrall, E. (2009) [1932]. The Nineteenth Division 1914–1918 (facs. repr. Naval & Military Press, Uckfielded.). London: Edward Arnold. ISBN978-1-84342-208-2.
This page is based on this Wikipedia article Text is available under the CC BY-SA 4.0 license; additional terms may apply. Images, videos and audio are available under their respective licenses.